The new way
of decorating with perspective carries a problem: there are only few items in
the game that are in perspective, and they may not fit in the room with
perspective we have just created.
There is no window that fits, therefor we can
only create our own windows…
…balconies…
…or even
paintings, if you are creative enough.
I will
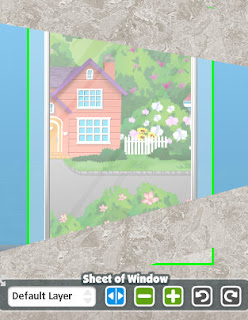
explain how to do it. Let’s start with the whole-wall window.
In a room
that already has a wall in perspective put this glass, the one you can buy at
the window store, and fit it in the wall trying not to show the edges that are
meant to be far.
Use the
longest curtain rods to mark the lines of the floor and the ceiling, so that
you can find the vanishing point: the place where both bars meet.
If just one
bar is not enough, use smaller ones until they meet.
In order to
find the mid point, use a courtain rod, vertically put, and shrunk to the window height…
…and put
another bar, horizontally this time.
Use two curtain rods, vertically put in each half of the window height, in order to find
each half’s mid point.
Put a bar,
horizontally, in each one…
…and tilt
them until they meet the others.
Then, put metal or wooden bars instead…
…flipping
them…
…and moving
them up to where the curtain rods are.
Once every
window bar has been replaced by a wooden or metal bar, and once the window is
framed, find its mid point.
Then put a
vertical bar, shrunk to fit within the window.
And just as
you did before, use curtain rods to find the mid points in each half.
You can use
this technique to create a painting on a wall, using the curtain rods to find
the vanishing point.
Put vertical bars and find how much they must be shrunk
the furthest one, and how much must the upper and bottom ones be tilt…
…remove the curtain rods and fit them until you get a perfect frame. Then fill it up with
your imagination.
This will
be the final image of the window.
For this
example I used a wallpaper and a window, through which you can see the houses
background (Default Scenery), or any other you choose.
If you
change the wallpaper and use one with an outdoor image, and then remove the
glass, you can see the landscape you choose.
You will
have to put a board or an extension to cover the parts that will become walls.
You can
decorate the “outside” of the window, but be careful: it could end up inside
the room instead of outside. If this happens, you must change the layer in
which the bars are, so that they end up in front of the decoration…
If you
remove (or don’t put) the horizontal bars, you can create a door. This is a
closed one…
Or, if you
place them correctly, turn it into an open door.
If you want
a balcony, add extensions to the “outside” part of that door. Be careful with
the layers because every item you add will make you choose another layer
different to the one you chose for the previous objects.
Be careful
with the slope of the outside extensions, because the angle must be smaller
then the house’s floor, so that you can keep the perspective.
Using a
wooden pillar you can create the base of the hand-rail.
Use an item
that can be resized to create the balustrade. (I used wooden vases for this
example).
And then
some shelves will be the hand-rail.
In order to
create this kind of balustrade, each row of items (floor extensions, hand-rail
base, vases and shelves) must be in different layers (2, 3, 4 and 5), so that
everything looks correct. This means that you must choose higher layers for the
wall extensions and for the metal bars framing windows and doors, so that the
balustrade is actually behind the rest of the items.
You can
leave the glass so that an scenery can be seen…
…which will
allow you to put a wallpaper to create the indoors walls, but be careful or you
will see this when you remove the boards…
…because it
is not always easy that items shrink to the size you wish.
If so, you
can use curtains to cover it.
If you
don’t want the window to be wall-window, but a simple one, the technique is
similar: you must cover it up and bottom with extensions, or use a glass with
the painting frame you created before.


